OLD View Lead Page Article: https://www.ringy.com/knowledge/old-view-lead-page
Anywhere in Ringy, if you click on a lead's phone number, it takes you into the View Lead page to see all of the necessary information pertaining to an individual lead.
LEAD DETAILS

You can update the lead's contact information by clicking on the purple pencil in the top right corner.
In this same section, shortcuts can be found via the associated icons to schedule a video call, send an email, send a text message, and open the lead's address in google maps. If you click the birthday cake icon beside the lead's birthday it will enroll the lead in birthday texts.
Choosing the drop down arrow to the right of the lead's phone number allows you to view the type of phone and carrier for the lead's phone number.

Below the lead's contact information is where you can view the Caller ID or in other words, the Ringy phone number you are using to contact the lead with. You can edit the Caller ID by choosing the arrow to the right of the Click To Call option.
The Click To Call option will initiate a call within our web application to that individual lead when chosen using our Built-In VOIP Phone / Dialer.
The Disposition option allows you to assign a lead a particular disposition tag, which is configured and managed from within the Manage Account tab. Assigning leads a disposition tag can be for different reasons such as for labeling purposes solely to filter leads by, to trigger certain automated actions attached to the disposition tag, or to perhaps enroll the lead in a different series of SMS or Email Drip Marketing messages.
- A lightning bolt beside the disposition tag identifies there is an automated action attached to the disposition tag that will trigger immediately.
- The exclamation mark beside a disposition tag means leads with this disposition tag are enrolled in their own set of SMS follow up drips. You cannot assign a single lead more than 1 of these types of disposition tags at a time.
- The ellipsis beside a disposition tag means leads with this disposition tag are enrolled in their own set of SMS disposition follow up drips.
 Additional information on the lead integrated with the rest of the lead data or uploaded as additional columns in the CSV File uploaded can be viewed below. You are able to delete other info entirely, edit the values associated to the other info, and add more additional information to the lead by clicking the + sign in the top right corner of this particular section.
 You can view as well as edit the lead vendor associated to the lead you have set up from your Lead Vendors page. Below you can view when the lead was created on your Ringy account, when the lead was last texted, and when the lead was called.
 The last section under the Lead Details tab allows you to schedule a follow up with the lead, create an appointment, and mark the lead as sold.
Scheduling a follow up with a lead is a great option if you simply need to call a lead back in for example, a few hours or a few months and it is not a set appointment per say.
By Choosing Create Appointment, you are creating the appointment on your Ringy Appointment Booking Page for the lead. For more information on Setting Up An Appointment Booking Page, click here.
SALE INFO

Clicking the purple pencils beside the field names allows you to enter the amount or value associated to each sale for your reference.
When you enter in a quote amount, it will prompt you to schedule a presentation text to send to the lead in the future. For more information on quoting a lead, and Quote Follow Up Drips capable of sending after entering a quote amount, please refer to this article: Quote Follow Up Drips
The Sold Products section will allow you to choose the product name, and the amount after you have set up Sold Products under the Manage Account as managed and created by clicking here.
LEAD PROFILE

The order of these tabs can be rearranged in the Lead Profile section of the Manage Account tab.
The SMS tab is where you can view the previous text chain for reference under Conversation. At the bottom of the text thread you will find a text box to compose any manual responses back to your lead. You can click the image icon if you need to send a particular image to a lead. There is also a dropdown menu labeled "SEARCH PRESET TEXTS" above the textbox if you have saved any so you can respond back to your leads faster as opposed to typing out a text over and over. You can create preset replies by going to the Marketing page in the navigation bar, choose SMS from the dropdown, and click the Preset Replies tab. You may also find a Suggest a Reply and Improve Text option above the textbox if you have added on the AI-Tools to your Ringy subscription.
The Activity Log will display any action taken on the lead including but limited to any time you have texted, called, updated notes, excluded the lead from drip messages, etc. You will find time stamps in the Activity Log as well. You are able to filter the activity log for certain actions.
The Call History tab displays any inbound and outbound calls. If you have recorded a call, you can find the recording in this tab. For more information on call recording, click here.
The Email tab is where you can view emails you sent the lead from Ringy and compose another to send to the lead on an individual basis. There is also a dropdown menu labeled "Select a preset reply" if you have saved any so you can email a lead individually faster as opposed to composing an email from scratch every time. You can create preset replies by going to the Marketing page in the navigation bar, choose Email from the dropdown, and click the Preset Replies tab.
The Calendar / Appts tab is where you can find any Google Calendar events you have scheduled with the lead directly. You can choose "Create Calendar Event" to schedule an event on your own Google Calendar for internal purposes. Alternatively, you can choose "Create Appointment" to book an appointment with a lead on your Ringy Appointment Booking Page.
The Video Meetings tab is where you can schedule a video meeting with a lead using our Scopey video meeting software. Scopey is free to use, and has screen sharing capabilities.
The Call Scrips tab is where you can access any call scrips created by yourself or by your company administrator. You must add-on Call Scripts to your subscription in order to create them in your Ringy account. For more information on Call Scrips, click here.
The Documents tab is where you can upload files to attach to a lead. It will not automatically send a document you have uploaded to a lead, but once uploaded, you can attach it to an email you send to the lead in the Send Email tab individually by choosing the paperclip icon below the email body.
NOTES

You are able to view your notes history below the text box. You are able to delete previous notes by choosing the red trashcan icon beside the note or edit the note previously inputted by choosing the purple pencil beside it. When creating new notes, by default, it will automatically save on the lead. You can instead choose to not auto-save your lead notes in the Preferences section of the General tab.
ADDITIONAL TABS + FIELDS
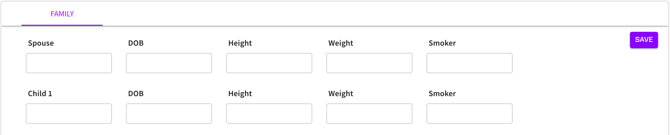
You are able to create tabs used to organize fields in the lead profile. In this screenshot, "FAMILY" is the tab displaying more fields to collect pertaining to the lead and their beneficiaries as an example.
The fields shown under this tab are used to collect the specific information. They can be reorganized within the tab and used amongst several different tabs you create.
You can create and manage the Tabs and Fields shown at the bottom of each lead by navigating to the Account Settings page in the left hand menu, choosing the Manage Account tab, and selecting the Lead Profile section on the left of the page.
ACTIONS
In the top left corner, you will find the purple drop down option to allow you to take certain actions on a lead.

Once selected you will find the following options to choose from:

You can choose to block or unblock a lead, mark the lead as sold or unmark a lead as sold, mark a lead as called or unmark a lead as called, and skip or unskip SMS and/or email drips. Blocking a lead prevents future outbound automated messages.
Scheduling a follow up with a lead is a great option if you simply need to call a lead back in for example, a few hours or a few months and it is not a set appointment per say.
You can schedule a verification call here if that is in your process.
Enrolling a lead in birthday texts will automatically send a text to the lead on their birthday. You can edit the birthday preset text by going to the Marketing page in the navigation bar, choose SMS from the dropdown, and under the Preset Texts tab.
Find More Phone Numbers takes you to FastPeopleSearch.com, which is a third party site to find more information pertaining to your leads including alternative phone numbers.
Choosing Google Search will search the lead's first and last name in Google on your behalf.
Select a pipeline stage should only be chosen if you wish to permanently put a lead into a particular stage on the Sales Pipeline page.
Transfer lead to agent is for supervisors with agents attached to their Ringy account to send them particular leads manually.
Deleting a lead will permanently remove the lead from your Ringy account, and this action is irreversible.