1. Create a SendGrid account using the same email address associated with your Ringy account: https://signup.sendgrid.com/
- Please note, unique email domains are typically not accepted or permitted to use for SendGrid. SendGrid will be most compatible when using an @gmail.com email address. If using a unique email domain, we recommend looking into Mailgun for your email service instead. In order to integrate with Mailgun, you will need to have your own email domain capable of adding a DNS record to it.
2. Click Settings in the left hand menu, and select Sender Authentication
3. Click Verify A Single Sender, and fill out the form that opens up. From Email Address and Reply To should both be the same email address you use to login to Ringy.
4. Check your email inbox for the verification email that SendGrid will send you to confirm your ownership of the email address.
5. Click Settings in the left hand menu, and then choose "API Keys" from the drop down.
6. Click Create API Key in top right corner.
7. Name the API Key, and choose “Full Access."
8. It will populate the API Key to then paste into Ringy.
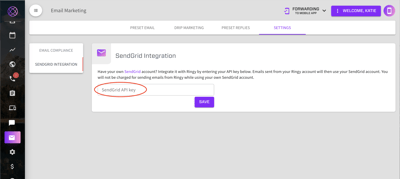
9. Navigate to the Marketing page in the left hand menu, choose Email from the drop down, click the Settings tab, and select SendGrid for your email service in the EMAIL SETUP section. This is where you paste your SendGrid API Key. Be sure to click Save once pasted and a green message below will confirm successful integration.
You can still receive event notifications in Ringy such as when an email is opened by following these steps:
1. Login to you SendGrid account
2. Click Settings in the bottom left
3. Click Mail Settings
4. Choose event webhooks, which will be on the top
5. Click create new webhook
6. You can input anything for the friendly name, that is just for internal purposes and under post URL, input: https://app.ringy.com/api/public/emails/handle-email-notification
7. Under engagement data put opened, and do not select anything else here.
8. Click Save
Need further assistance? Here is a link to SendGrid's Support Center: https://support.sendgrid.com/hc/en-us/requests/new